Tuesday, August 30, 2011

kitchen makeover part 2

So you remember how I told you that I have already painted my newly painted kitchen.... yes I have completely lost my mind!!! sometimes that's what you have to do to make sure that everything is just perfect....or something like that! I have driven myself mad by constantly looking at it and realizing something wasn't quite right! Then while talking with a good friend she mentioned I that maybe I needed was something with more contrast...boy was she right!! I am completely in love with the new look.... I finally realized that I needed a warmer gray to really make it work! 
I added a lot more white accents to my shelves and what wasn't white I sprayed it white......thank heavens for spray paint
 
I decided to take off the orange leaves up top to make it more simple but it was a great experience to do it once
I love the more contemporary look with little pops of orange here and there


Thursday, August 25, 2011

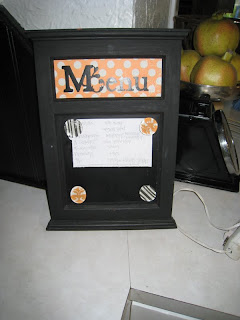
Menu board

Okay so let me first just say I totally suck at updating!  It's something that drives me crazy and I have so so so much to post but can't stop at what I am currently doing!!!!!  Once I start something I hate to stop...I hate to take the time to eat and pay attention to my kids....to sleep and sometimes even to breathe!!!  It drives me absolutely crazy...I have spent so much time picking the "correct" paint colors...what looks good on one girls blog doesn't quite work with mine...so I found out...more about that later...yeah I have already repainted my freshly painted kitchen...that's my next post!  More or less what I am trying to say is that I will do better and post as I go rather than wait forever to post everything at one time!

 So once upon a time my old kitchen had more of this theme....but it doesn't now.  So I decided time for a little refresher!  I love the menu board and use it all the time so I couldn't just justify getting rid of it!
 So I grabbed some Halloween paper and measured the rooster area that I wanted to cover and cut out accordingly!  Yeah I am retarded and can't cut straight so I used my sewing mat and ruler to get it straight!  That's how I roll....
 Then I used my handy dandy Cricut and cut out the words Menu
I took some glass beads added a little Modgepodge glued on the magnets and stuck on the magnet board
here it is in all it's glory!! I love repurposing!!! Sometimes all you need is a little makeover to give something a completely new look!

Sunday, August 14, 2011

BLOOM

Xanders friend Ellie had her baptism last Saturday and the orginal project I was going to due went South as it just wasn't working....that seems to be my thing lately...so we came up with an idea for Ellie's room.  It is pink and green.  We managed to match her color of green perfectly thanks to Krylon.....

 I ran out of time to take before pictures as we only got this done 5 min before the baptism.  Sometimes that is just the way my brain works and I just go with it....I have all week to think about it and my BRILLIANT ideas only come the last min! What can I say you just roll with the punches right????  So anyways the top frame was a dark brown and the bottom frame was gold. I picked both up at DI for 2.50.
 Next I used my Cricut to cut the vinyl and letters and the flowers too!  Love my Cricut.  I had Xan help me pick the paper and the only thing I wished we would have changed is the background it's too busy for what we had going on....but what can you do right????
I went back and traced around the bloom with black marker so it would outline it a lot more...sorry no picture!
I loved the way this frame had three slots to do the flowers in...all in all it turned out ok!

Tuesday, August 9, 2011

kitchen makeover revealed

wow this has been the total remake!!!  It took a whole lot longer than expected but i am learning that this is just how it goes with me lately!!!  A lot of people have asked why mess with your kitchen...we love it....
Well when i see something that i love i JUST have to try it out...and so the story begins
  for starters i decided to paint the bar area black...that was about the only thing that went perfect on this revamp!!! arggghhh!!!
 this would be every cushion and pillow I own that my little handsomes decided to turn into a fort!!!!
 aren't they so cute? I couldn't help but put some of thier cuteness in...I am ever so glad that they are having the time of their lives while their mother is busily painting away.
 While in the midst of our redo I decided that I wanted to have some liners for my pots and pans. I decided to take some old fabric (that was actually our bedspread at one time) and make some liners so my freshly painted cupboards wouldn't get scratched. 
 I measured all the areas first and cut the fabric. I bought some felt by the yard first so i would be big enough and i wouldn't have to piece it and second so that when I slid my pots and pans on it wouldn't scratch the paint.  Then I used the Elmers spray glue and stuck them together and then sewed 1/4" around all the edges so it would be extra sturdy. ( I hope all this made sense my mind is going a million miles a min right now) 
 most of the supplies I had so it was a very inexpensive way to make liners and if they get dirty through in the wash and clean and if you just are sick of them...throw away.
 Drum roll.........please...........................Here it is the new look.....


some of my favorite pieces
from this....to this


this ............................to this


this...............to this...amazing what color will do right?????

Monday, August 1, 2011

meet claw....

once upon a time my husband and i came across the COOLEST claw foot bathtub ever seen....but we didn't have room in the house we were renting so we passed on it and have thought about our cute little tub ever since...okay maybe not ever since but we VOWED that if we ever came across a claw footed anything again we would so buy it!!! This was a must....
well while out shopping at our local D.I. I came across this baby
...he came with a set of 6 chairs....the chairs are in the right corner and well they didn't really go with the table but it came as a set and so anyways they had it marked at $150.00. I almost died....yes I am thrifter thrifty by heart and that was a TON of money to me especially for D.I.  I talked with the hubs and wanted to see what he thought because we have a rule that you don't spend over $20.00 without consulting the other.....after a long time thinking...yea like 2 hours at D.I. because I couldn't get a hold of him and then running home to measure it.....we decided to get it!!! (wow that was a really long story and you are probably sleeping now so I will spare the rest of the details)
so here he is in his fotmer glory
plus he is an amazing round table which we have been dying to have as it maximizes our space so without further introductions....meet claw....at least that is what my boys call him
up close
he came with two leaves....which is perfect for the holidays
here he is all sanded and ready to to....like our makeshift spray booth....it felt like we were working on a set of CSI or something....
check out those legs...aren't they fab!!!!
first we sprayed it white from our primer....(note to self don't use Gripper it totally didn't bond we found that out the hard way and actually had to do the top not only once but twice....use Kliz)
then we sprayed the top with a dark gray
then we sprayed the bottom an off white so loving the legs!!!!
then i used a black glaze and rubbed it all over the bottom of the table to really bring out the details....he is so curvy...it gave me lots to work with
don't you just love the feet....
here's the bottom again....just can't get enough...
when we FINALLY got the table done and put inside our house my boys... 7 and 3 came downstairs and said " we finally have a table and it has feet!" My 3 year old said "dats cool feet mom.....let's call him claw" 
 here he is inside...not too sure what the flowers were doing on top but it's all about the table anyways right????? 
 For some reason my pictures are crazy but you may or maynot be able to tell but we actually changed the top to black.....oh indecisiveness...actually we went to add the poly---that's when it all bubbled up thanks to our awesome primer so we had to strip back to the raw wood and then start all over.....all i can say is thank heavens for Kilz....I didn't take any pictures of that as it was VERY painful!  I have NEVER in my crazy life worked on a project for SO SO SO super long!!!!
 Isn't he loverly???


so a little recap from this.......
 

 to this. Don't you just love the new look???? can't wait to show you the rest of the kitchen....ran into a few problems so hopefully it will be ready to post the on the weekend!!