Tuesday, July 26, 2011

kitchen makeover part 1

When you can't beat 'em....join 'em...am I right or am I right????  So this is what happens when you check one to many blogs you start to get way to many ideas.....
so I decided to start a major revamp...why you may ask???? Why not??? haha.....ha
So it begins.....
yeah you know you have to check the paint samples on the while for a while only thing is is that my two paint samples are yeah pretty much way to similar so you can't tell anyways but it was the thought that counts right?
Then this is what happens when you have a girls night and spend the whole entire day looking for a motorcycle helmet for your 7 year old who has an incredibly BIG head!!!!!  So you leave the primer on the wall and your painters tape up....let's just say it adds for interesting conversation.
So I am sowly learning how to take good pictures but I painted my walls from a tan to a white light gray can't really tell though can you??????
Cabinets before so loving but actually hating as the distressed is stressing me out....oh bother!!!!
Then....this is how my brain works....it's all over the place can you tell but that is actually how I get things done.......so I decided why not take it to the top! 
I love the new look with the stencils that you see on Mandi's Vintage Revival blog only I don't have flat walls mine are super duper super textured.....sore subject we won't go there!  So this is my little area to play with....
So I pulled out my handy dandy Cricut (can you tell we have been watching Blues Clues) and went to work...I love this design it's just refreshing....so I took my little pencil and traced it onto my walls ...I had to prove to myself that I could infact paint in lines....that's pretty big for me...actually i just wanted to stencil some just to say I did...
so you can't really tell but if you could see it you would notice the wonderful tracing I did....yes I feel like my soon to be second grader.....bragging of his latest accomplishements
So here it looks after my wonderful hand painting.....yes I did it time to check that off the list....one for the record books!
Here it is all done....don't worry if you are having a heart attack that the cabinets no longer go with the paint...I'm working on it...one thing at a time....I can't wait to show you but am still trying to figure out the hardware and just can't show you until it's complete...weird I know but hey that's me!
So here is a better look at the cabinets and beadboard....just you wait your socks will be blown off!
Here is a little preview that infact the cabinets are being made over.....
to be continued.....

Sunday, July 24, 2011

the others

A few weeks ago I posted my zebra chair makeover and mentioned that I did two more.....
well here they are...
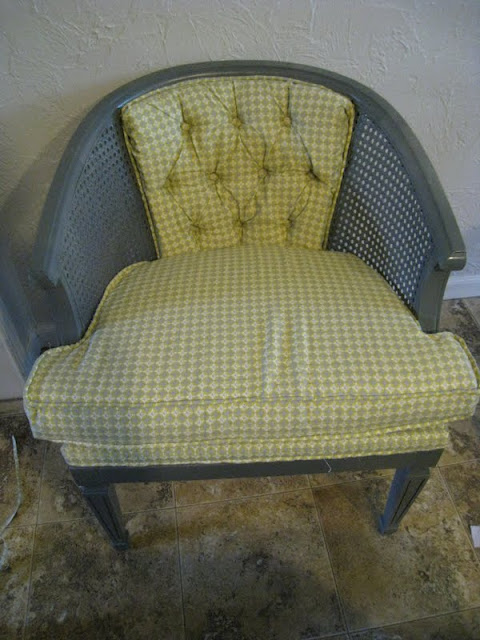
 I am so in love with the colors and patterns on this....the only thing I would have done differntly is to spray these two chairs with Classic gray rather than Smoke gray because it would have matched better but I am learning that you totally learn as you go and well yeah whatever....that is what I will keep telling myself but my handsome husband loves them are they are his "gaming" chairs that go in the "play" room upstairs.  He actually picked out the fabric...who says men don't have good taste? right???

Saturday, July 23, 2011

The PINK owl

Hey hey hey I am back..... so you know that lately I am obssesed with owls right??? Don't know why there is no ryhme or reason behind it I just think they are ADORABLE!!!!  So I came up with an idea for... two cute girls who are having cute baby girls (make sense right?)something to put in their nurseries....still with me???
I found these white shelves...I love love love repurposing....
cute out a pink owl using my Cricut and put on top....super cute right?

 better picture...sorry sometimes I just get so excited I don't want to take the time to do it how i should...isn't she a beaut???

Friday, July 22, 2011

Did you miss me?

Wow this summer is flying by....less than a month and my little man goes back to school to start his adventures in the 2nd grade.....I can't believe it.Well I have to ask did you miss me??? I sure missed all of you and your fun comments...hats off to Deanna and Emily who keep me going as they are the BEST commenters ever!!!!!!  I think they deserve a prize don't you?!? I will have to come up with something fun for them!
Sometimes I wonder if I should keep blogging.... if anyone out there is reading my thoughts and catching the vision of my crazy ideas.....I love crafting  and just need to do it for my sake but it always gives me lots of motivation knowing that there are those who are rooting for me and even though my followers aren't in the thousands like those I stalk I mean follow myself I am so very grateful for those of you who do leave comments of encouragement and take the time to look at my blog!  Seriously I don't think you know how much that means to me. 
I love that I can share my ideas and that there are those of you who like them and some of you even do them yourselves....
I am just having one of those days of insecurity...what can I say I am human right...
I have to get this out of my head so that I can clear some space to get going with some real stuff..you know what I am talking about right....like some projects going here.  When my head is fuzzy (which happens quite a bit) nothing happens. 
You may see more of just random thoughts on here because sometimes that I what I do before I get motivation for more projects...today has just been on of those days.  On my path of discovering me and my style I have come to realize my blog lacks emotion...it lacks the ups and downs of me and my crazy crafting brain...it lacks personality....so I am going to try to be "real" and "raw" one may say and add some character...some pizazz, flair and style!!!!  That is what I was thinking today.Has anyone else ever had one of those days????

Saturday, July 9, 2011

reupholserting a chair

While on a shopping trip at our local D.I. (thrift store) I came across the perfect chair...or should I say three chairs.  This is how they started out a true beauty eh????  I know I know a true looker right?
after a few hours and I do mean a few hours of massive brain power thinking through how to disassemble and reassemble this chair I started to get to work.
This is a back view of the looker great right?  You have to get the full effect before the complete tear down.
So let the games begin.  I grabbed a pair of pliers, some scissors, a knife, a screwdriver and got to work.  I love love love taking something old and making it new.
I took off the first layer and pulled out the cushions then I started with the inside of the back part.
When you look at the bottom of your chair you should be able to find the screws and unscrew the seat.  Once you get that off you start to get to the bare bones.
Once you have all the pieces off then you can get to the fun part.  The start of the rebuild that is my favorite.
So to start off with I took my chairs outside and started priming.  Hint use Krylon spray primer but you want to make sure to shake it for about 60 seconds otherwise I found out it comes out grainy...not so good!
Here it is in all it's glory....primed glory!
Then I sprayed with Krylon's smoke gray....you see two chairs because yeah I like a challenge and decided to tackle three...what was I thinking you may ask?  Not so sure.
So here is the "guts" to the chair.  I kept the cushions.....don't worry I shampood  the heck out of these babies....I didn't want to look forever to find new cushions...and the top was already predrilled for the buttons...
You like right?  Time to get to work...again
So here is a valuable lesson to pass on....first trace your previous pieces onto out butcher paper...that way if you get it wrong or screw up then you only waste paper and not fabric...especially when you don't have enough fabric...like I said a little bit of info....found out the hard way.  So long story short lay out your pieces onto you fabric and then cut out.
I always work from front to back..so I started with the seat and recovered with batting and the fabric then stapled into place.
Then I took the seat base set that back on to make sure that it fit before going to the next step....it's looking good right????  Well we can't stop there so here we go....
Then I took my back outside piece and started to staple into place 
Here is the back view
Once that was done I got busy on the front part...I started to staple in the middle and then work my way out....
Once I got the top piece on then I worked on my piping to close up the gaps.  This I hot glued into place.
Here it is all done....ha ha tricked ya didn't I....it's almost done it just needs it's cushion.....
From orange gross velvet to gray zebra quite a transformation right???
Ta-da....here it is a whole lot of fun and a whole lot of work!!!!

here is a closer view of the buttons.
easy peasy right???  Just remember when you take a chair apart make sure to # the pieces the way you took off....you can take notes...pictures whatever makes it easy for you to remember ..... and then just make sure to put the pieces back in the opposite order you took off.

Friday, July 8, 2011

quick fix...change the shade

a new lamp shade can make all the difference in the world
 do you remember the lamp surgery post?????  I love these lamps and have always wanted to use them over here but they were to tall and since finding square shades they work so well as they don't block the pictures and give a cleaner and simpler look.
 crazy eh??? how something so small can make such a BIG difference
Thank you Wal Mart for finally putting these lampshades on clearance so I could snatch them up.....aren't they fun????

Thursday, July 7, 2011

choices...choices...

Lately I am having a very hard time trying to decide things....don't know what it is but hey if you can't beat them join them right?????  So I took matters into my own hands and went to work....

I cut some strips and went to work...
 yes as you can see I pinned them onto my lamp shade
 gray or...
 white??? you like how it's hanging off the side...funny eh???

 Well as you can see I had something on there
before and tried to take it off but it didn't come off to easy so while taking it off I made a hole on my lampshade...


as you can see I decided to go with white....how to make you may ask???
I took a white linen and cut into three inch strips and measured the length of my lamp shade...I knew I wanted a ruffled look so I left them a lot longer.  Then I used my sewing machine and put it on the longest stitch and sewed across then gathered by pulling the strings on top and bottom...make sense yet????  After making a million strips...okay so not a million but a thousand...hahaha then I used my hot glue gun and went to work.  Hey a least I covered the hole I made in my lamp shade and now have some cute and ruffely lamp shades.
I am glad that I took the risk as they turned out so cute and I have had so many wonderful compliments on them...so thanks to all for your help and encouragement...you guys keep me going and make my day!!!!! So here is to you..you're the best!!!!